
How to Change the Background of a Photo
Part of the guide: Background remover
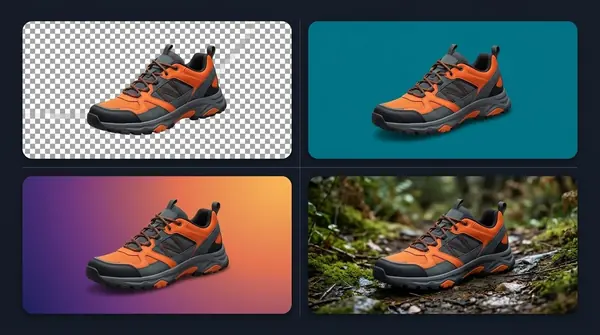
Changing a background has two parts: separating the subject from the old background, then placing it on a new one. The first part is automatic with a background remover. The second is where a convincing result comes from.
The steps
- Remove the old background. Use an AI background remover, or a manual selection if the background is simple. Check the edges.
- Choose the new background. A solid colour, a gradient or another photo.
- Place the subject on it. Many tools do this in one step.
- Adjust and check. Look at the edges and the overall light before you export.
- Export. If the new background is solid, JPG or WebP is fine. If you still need transparency, use PNG.
Choosing the new background
| Background | Good for | Watch out for |
|---|---|---|
| Solid white or light grey | Product photos, catalogue images | Needs clean edges, because any fringe shows |
| Solid brand colour | Team photos, social posts | A strong colour can bounce onto the subject's edges |
| Soft gradient | Headshots, profile photos | Keep it subtle so it does not distract |
| A real scene or picture | Mockups, creative edits | The light and perspective have to match |
How to make it look natural
An edit gives itself away when the subject and the new background disagree. Check these:
- Light direction. If the subject is lit from the left and the new scene is lit from the right, it looks pasted on. Pick a background with similar light.
- Colour and warmth. A warm indoor subject on a cold blue scene looks wrong. Adjust the colour balance of one to match the other.
- Edges. A thin fringe of the old background (a halo) is the most common tell. Check the edge on the new background, and see cutting out hair and fur cleanly if the edge is rough.
- Shadows. A subject with no shadow looks like it is floating. Add a soft shadow beneath it if it should be standing on a surface.
- Perspective and scale. The camera angle and the size of the subject should make sense in the new scene.
Doing it in BG Remover Pro
In BG Remover Pro, the Background Replacement Scheme has three options: Transparent, Solid Color and Backdrop Image. Choose one, process your photos and the result is exported with that background, so a whole folder can get the same new background in one run. It is our own app, so that is a disclosure, and it runs only on Apple Silicon Macs with macOS 14 or later. It does not add shadows or match lighting for you, so for a realistic composite you will still adjust those yourself in an image editor.
Be honest about what you edit
A new background is fine for a logo, a banner or a catalogue photo. If a photo has to be an accurate record, such as a product listing, a news picture or an ID photo, do not change anything that misrepresents the subject, and check the rules of the place where you will use it.
Frequently asked questions
How do I change the background of a photo?
Remove the old background with a background remover, then place the subject on a solid colour or another picture and export it. Check the edges and the light before you finish.
How do I make a replaced background look realistic?
Match the light direction and colour of the new background, check the edges for a fringe, and add a soft shadow if the subject should be standing on something.
What format should I save it in?
JPG or WebP if the new background is solid and you do not need transparency. PNG if you need to keep it transparent.
Can I change the background of many photos at once?
Yes, with a batch-capable tool. BG Remover Pro applies the same transparent, solid colour or image background to a whole batch on a Mac.

Need to do this for a whole folder?
BG Remover Pro is the Mac app we make. It removes backgrounds in bulk, on your Mac, with nothing uploaded, and you can try 20 images free. See pricing or what it does.